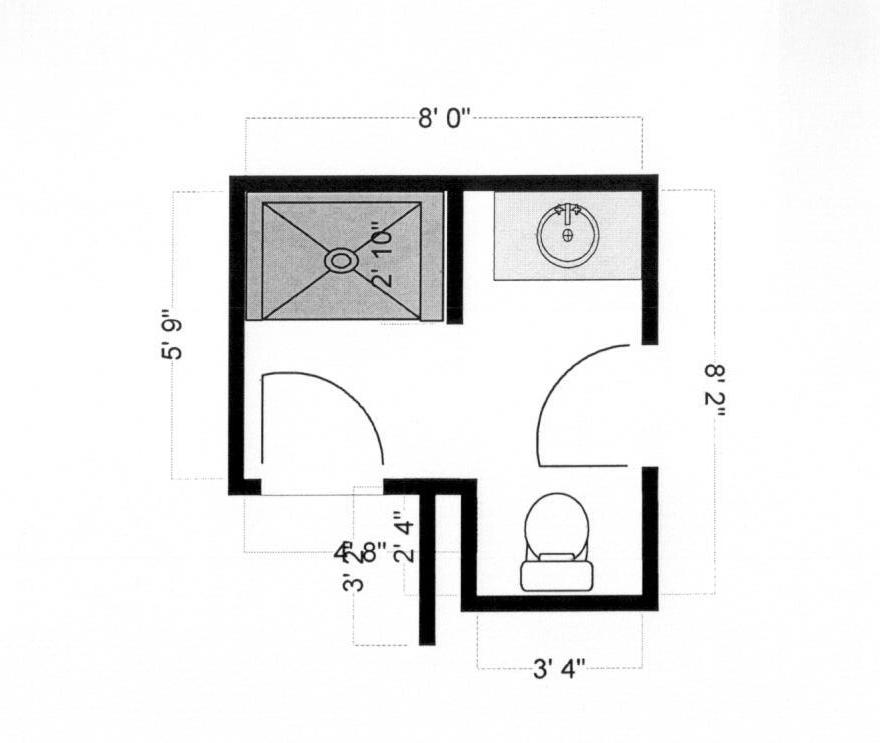
One week ago I was happy that I mostly passed the framing, plumbing and electrical rough-in inspections. Later that night, Easton wanted me to install the switches, outlets and light receptacles. Then we had light in the bathroom! Over the weekend I installed the Boca plates, the fire boards and also applied water-proofing to the baseplates. I emailed pictures of my work to the inspector and he gave me the go-ahead.
Next up is the shower inspection. The inspectors want to know that builders are not putting drywall under the tile in the shower, so I have to get another inspection after installing the backing board in the shower.
Last night I plumbed the drain into the shower. The drain placement wasn't perfect, so that required a bit of work (and frustration). This afternoon I put up the Hardi-backer underlayment boards in the shower, as well as one piece of drywall on the ceiling above the shower.
No, I didn't get the hard-backer for free. Honestly, I am not getting much for free at this point. But more on that later...
I am feeling relieved right now. The city building inspector just left and I am wearing a smile because I passed the inspection! Well, I mostly passed the inspection. I have a couple of items I need to add/fix, and then I can move on.
First of all I need to add Boca Plates to the few areas where the PVC drain and copper water supply lines pass through the framing. Honestly, I figured he might ding me on that one. I just wasn't sure if I also needed them on the places where the electrical lines pass through. Fortunately, the code says that as long as the wires or pipes are 1.5 inches deep, no plate is needed. So, I only need to buy a few plates.
The second thing I need to add are fire blocking at the points where my drop ceiling meets the walls. Once again, I thought he might ding me for this. I recently learned about fire blocking at a very helpful basement finishing website (http://www.ifinishedmybasement.com/framing-basement/fire-block). While I didn't fully understand how to apply it to my situation, I did learn from the article that if the inspector mentions it, I shouldn't give him the deer-in-the-headlights stare of confusion. Rather, I acknowledged it and asked the inspector where all I needed them. Luckily, I only need them along a couple of walls.
Finally, (and on this one I feel a little embarrassed...I should have done my research). I didn't know that I was supposed to use treated wood on the bottom plates of the wall framing. Luckily, I will not be required to rip it all up, but merely need to seal those board with some kind of wood sealer.
So, give me a couple of hours some night, and I will be ready for drywall.
The next inspection? I will need to install the shower pan, install the wall treatment behind the tile (Hardi-Backer) and then call for another inspection. They just want to make sure that I am not putting drywall behind the tile in the shower.
Finally, the inspector told me that the one year deadline is not absolute, but that as long as I stay in constant communication with their office, I will be fine. I will pretend I did not hear that, though, as I generally need hard deadlines to get me motivated.
Early in January I realized that I was getting close to a deadline. The building permit that I obtained for my bathroom project expires after 1 year. I remembered that I applied for it in March 2013 and reality set it: I better get going! Then I dug out the permit application to see when in March. It is March 13! I really better get going!
I have been slowly working on the framing and the plumbing. Although it took a while, I decided to use copper instead of PEX, since the rest of the house is plumbed in copper. I learned just how important flux is. At first I didn't use nearly enough on the joints and became very frustrated. Once I figured out I need lots more flux, then it went fast!
Then came the framing. The hardest part of framing was framing around the HVAC ducts in order to hang the ceiling. Lots of hammering in extremely tight spaces!
This has been a lot of work! I was glad to hear Erica tell me yesterday that it is finally starting to look like a bathroom. That was good encouragement.
I finally started the wiring a couple days ago. I learned from the inspector that bathrooms require a 20 Amp circuit, wired with 12 gauge wire. Ouch! I had plenty of white, 14 gauge wire, but alas, another trip to the store!
Yesterday's snow day really helped and I finished the wiring last night, cleaned up my tools, swept and vacuumed. This morning I called City Hall and scheduled a rough-in framing, plumbing and electrical inspection for tomorrow morning!
Some people have the project that will never end. This has felt like the project that will never begin. After one year of collecting materials, I finally got a permit in March, but then didn't really start the project. I knew that the first part would be the hardest for me, as I have no experience cutting into floors and plumbing drains. So I waited, procrastinated, etc. I finally asked a friend to help me cut into the floor. Then I waited some more, did some "research" on how to properly plumb a drain, and waited longer...Yes, I am a classic procrastinator.
I cut the main toilet drain!
Like most procrastinators, I need a deadline. And I discovered on in the fine print of the building permit. If I did not start the project within 6 months of the application date, the permit would be void. Likewise, if I don't finish within 12 months, the permit will be void. I already paid way to much for a crazy permit, I don't want to pay for another!
So last week I dove in again. I knew that I wanted to connect the shower drain to the main line, but wasn't sure if there were code issues with doing that. Just to make sure I was doing everything correctly, I stopped by City Hall and talked to the building inspector. He said I could do it, but told me that I needed a back-water prevention valve to insure against sewer water backing up through the shower drain. That cost me $40, but to be honest, I was worried about this issue anyways. After all, a shower drain in a basement is a virtual floor drain, and backups are nasty, and tend to ruin nice bathrooms! However, he also told me that since I am running only a 3 foot drain to the main line, I could wet vent the drain and would not have to run vent pipes! That saved me some money! I am glad I talked to him!
On Saturday morning, armed with everything I needed, I cut into the main line. It was do-or-die. After all, there would be no flushing in our house until it was all glued back together. I purposefully waited until I had plenty of time, with many hours available to run to the store. (You don't start this kind of thing at 9 PM) It took longer than expected, but I got it done.
You must use a "Y" connection when tying into a drain line!
This afternoon, the building codes inspector stopped by and approved the drain system and told me I can fill my holes, pour concrete, and move onto the rest of the framing, plumbing, and electrical!
Note the cool clean-out access for the backwater valve!
A "point of no return" is just that - the result of a decision or
action from which there is no going back. Kind of like the minute your
toe leaves the diving board. You will get wet. After a year of
gathering materials and, honestly, just procrastinating, I cut a big
hole in my basement floor. And we are not looking back. This unused
space is on its way to becoming a working bathroom.
This
bathroom was designed and roughed in to be a mere half bath. But we
realized that we needed one more full bathroom in order to make it easy
for guests to shower. It is not too difficult to add a shower - except
for the drain. The drains are already plumbed for a sink and a toilet,
but not for a shower. In order to add a shower drain, I have to
connect to to the existing drains, and vent the line to an existing vent
pipe. That means cutting a trench in the concrete. Not too difficult,
right?
I was initially going to cut the floor with a
circular saw equipped with a masonry blade. It probably would have
worked. But it would have taken a long time. It turns out that the
floor was 5" thick in some places, so it would have taken a really,
really long time! When my friend Brett heard about my project, he
volunteered to bring his gas powered concrete cut-off saw with a 14"
blade. That did the trick. It even has a water line attachment, to
which we connected a garden hose. Nice! We vented the room and covered
the doors, furnace and laundry machines with plastic. I ran the wet
vac and Brett sawed the floor. He broke up the concrete and I pried out
the chunks. It went fast!
The shower will sit here
We thought we were done -
but if you know how construction projects work you already know that we
were not done. We assumed that the sink drain connected to the toilet.
So cut the trench and find the pipe, right? Wrong. It turns out they
weren't connected. So we cut another section, going around the toilet
drain, and I will have to tie it in there.
Here is where we tie into the drain
So my
basement sits with a long trench inside a soon-to-be bathroom. Next I
will plumb the drain line and the vent. Then I will frame the walls and
run the water pipes. At that point, I get to call the inspector and
hope it passes.
Thank you, Brett Parsons for helping
me! If you live in the Kansas City area and are looking for a massage
therapist, give Brett a call. If you are a looking for a chiropractor,
give his dad, Charles, a call. They work together at Parsons Chiropractic in Peculiar, Missouri. You can reach them at (816) 7791022.
One
more thing - I discovered a new tool today. Of course, I have heard of
a hammer drill. Who hasn't right? But did you know that Makita (and
maybe a few other companies) make a combination hammer drill/chisel?
Basically, with the flip of a switch. you can turn off the rotating
drill and use the hammer feature only as a chisel. Want one for yourself? Here it is at Amazon. (And yes, I get a small commission if you buy it)
After a full year of collecting sheetrock, shower pans and Sakrete, it is time to move to the construction phase of this project. My plans are finalized and I know what to do. Now it is time to dot it. I still need a few items, but at this point I will have to either buy them on the day I need them, or hope to still find them. Enough waiting... let's go!
The launch of the construction phase was initiated by the application for a building permit. I guess I should have done my homework. I thought a building permit for a 100 square foot bathroom would only cost $50 or so. But after applying for a plumbing permit, an electrical permit and a general permit, the final cost was $231. Oh well. Someone has to pay for the inspectors' salaries- and the conservative in me says it ought to be those using the services and not the general public taxpayers. And a building permit really connects me to some additional resources. For instance, when I applied for the permit, I asked the inspector if building code allows me to connect PVC pipe to ABS pipe. He was able to save me a lot of research time by giving me the official answer. (Which, if you are interested, is "yes, provided you use the proper fitting).
So, I must ask for an exception to the "free" part of this project. In this crazy endeavor to do a free bathroom, I cannot conceive of how I could ever obtain a building permit for free. And yes, for this project of this extent, and especially since I am broadcasting its progress to the world, a building permit is necessary. So, with your permission, I will not count the cost of the permit in consideration of the free-ness of the project. If that is not okay with you, you might want to then think of this as the $231 bathroom.
Step one of the project will be to cut the floor and connect a drain line from the shower to the current drain at the sink. My friend Brett has a large concrete saw and has volunteered to help! (That will be much easier than using a carbide blade on my circular saw). Anybody have an electric jackhammer that I might borrow to break up the concrete? (That would be much easier than using a sledge hammer)
Yes, I am still working on this bathroom project. After almost a full year of gathering materials and planning the project, it is now time to start working. I am almost ready to submit my application for a building permit.
As I put the project plans on paper, I decided to set some of the actual pieces in place to get a better idea of the layout. Since I am not an architect, what looks good on paper doesn't translate well to an accurate mental picture of the finished project. My suspicions were correct. My original floorplan was much too small.
I know what you are thinking. I should have done this much earlier! However, it required moving one of the framed walls. It was a no-going-back-now moment! So in order to relieve the ultra-cramped space, I decided to move the wall further out and turn the shower ninety degrees. This will create more space for a person going into and coming out of the shower.
The only problem is that now I need more tile to cover the floor and more drywall to cover the walls and ceiling! Oh well, it is time to move forward!
Having said that- here is the revised floorplan:
For reference, here is the previous version. Notice that space in front of the shower. I now know that 3 feet is not enough space!
I have already thought of twenty ways I could get my free bathroom quickly and easily. However, I don't want to break my streak of jail-free nights, so 10-12 of those automatically off the list. I am also arrogant enough to think that someone might read this blog and try it for themselves. Therefore I would like my project to be successfully repeated by others. So I have developed a set of rules for myself. And I need your help to stay accountable to them!
Rule #1: Play by the rules. My daughter might someday take a shower or curl her hair in this bathroom. I would prefer that she not scald herself with what she thinks is cold water, nor electrocute herself with a mis-wired outlet! That means I will have to find a GFI outlet, not settle for the non-GFI one sitting in my electrical supplies tote box! I will submit myself to professional construction standards and city codes. I will probably need a building permit. (And I am not sure how I will get that for free).
There is a huge temptation to view building codes as overreach of government, breach of privacy, and cover-your-butt overkill. But they are not. And I just need to get over it and submit.
I will also try to work safely at all times. I can't promise that I will wear safety glasses at all times, but as a good Boy Scout, I will try to live out what I learned from the Safety Merit Badge.